Using Apps in the Classroom, iTunes U courses

apps9

Apps in the classroom collections is series of courses that offer ideas and activities to teachers who are interested in integrating technology in their classrooms. The collection includes activities that are appropriate to certain age groups and/or subjects. The ideas encourage problem solving, creativity and exploration through technology with a educational goal.apps8

There are 18 books to explore in this collection. The other three books that caught my eye, other than the SketchBook Express that I’m reviewing, are Puppet Pal’s HD Director’s Pass, Stop Motion Studio and If Shakespeare could Tweet: Transforming Literature with iOS.

itunesuI found this collection by selecting my iTunes U app on my iPad. Once I entered the program, I looked for the “For Educators” icon. I was then transferred to a screen with several different categories. I scrolled till I found the category “Using Apps in the Classroom” with a line of blue books underneath. I selected “See All” to scan over the 18 books in the series.

As I read about each activity in the classroom, I enjoyed how technology permitted art integration into each subject. With each activity, students were drawing on the apps10sketchbook app to illustrate concepts, ideas and labels. Not only were they absorbing information but they were associating each subject with a illustration. This can increase memory and engages students who are preferably visual learners. I also loved how the activities were aligned by age group and subjects. But the ibook provided enough information through the objective, overview, activity and sample rubric, that the activities could easily be altered for different age groups than prescribed. apps

apps6

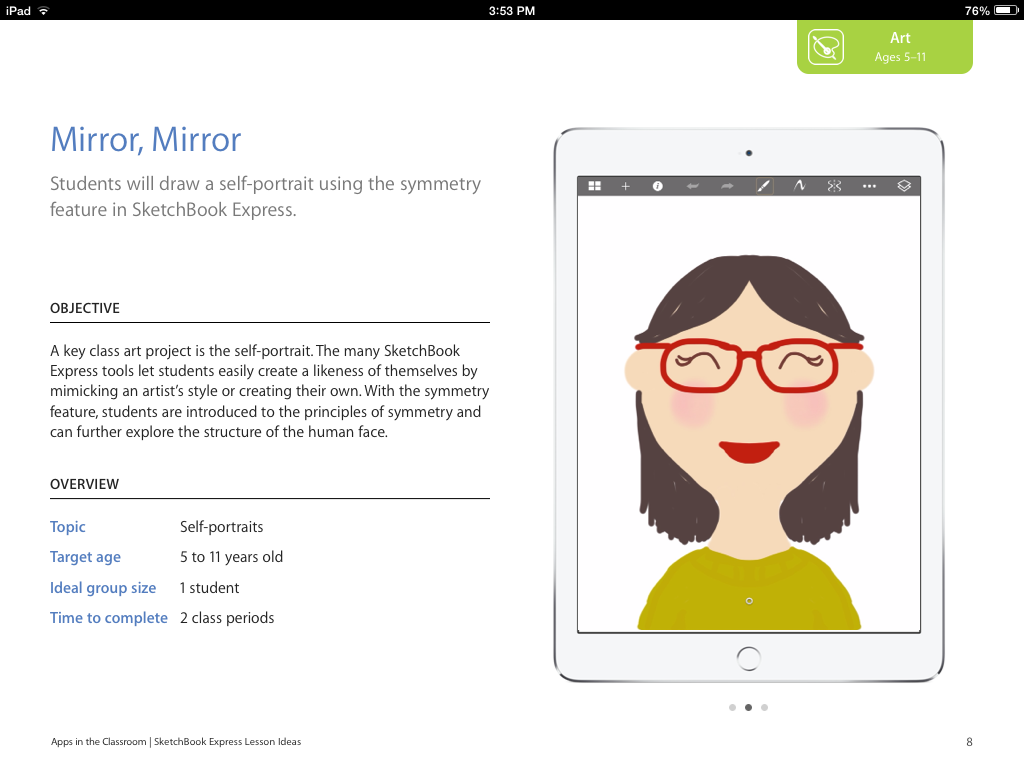
A couple activities were truly interesting were the science and math lesson. I didn’t except to find activities in either of the subjects that could include art, technology and educational subject. The first I’d like to elaborate was the Mirror, Mirror activity, which focused on symmetry in math. This activity was listed for 5-11 year old so that alone provides some freedom. The students are instructed to draw a self portrait using SketchBook Express. The app offers the students a symmetry feature. This activity enables students’ creativity as well as research while the students look for artists’ styles and self-portraits for inspiration. Symmetry is difficult free-hand; however, this app allows students to skip over the frustration of producing accurate symmetry and focusing on the concept instead.apps2


The other app that I enjoyed learning about was the Solar System Concept Map. This activity required student to create a concept map using Sketchbook as well. They may experiment web or hierarchy maps as they label the planets, stars, moon and more. I loved how the app displayed the spatial distance of the solar system and distinguished the concepts of the map without getting over crowded or messy. Furthermore, I enjoyed how map and solar system looked similar when placed side to side. The Sun was the center with various planets surrounding it just as the planets surrounded the main concept of the solar system in the concept map.


apps4 apps3       


Overall, I really enjoyed looking through the sketchbook course. I received several ideas that I’ll integrate into my own classroom. I also realized that apps can introduce an artistic element and organization to subjects. The course also supported the idea that apps are available and can be used by any age. The same app can be used for kindergarten math to senior science. Apps are becoming a vital and useful tool in the classroom.


One Best Thing

ibook3

Have you ever been to conference? Did you go as a kid? Was the conference organized by kids? No..? I guess you didn’t attend Kid’s Connect, a conference by kids for kids.

Mike Anderson founded this conference and created it to what it is today. He is part of the ADE program which focuses on using Apple Technology in and out of the classroibook2om.  Anderson is one out of many people who are utilizing and encouraging the Apple products integration in the classroom. They are devoted to discover to opportunities and apply new ideas to help engage students.  He realized that value of problem-based learning. And so he created the conference, Kid’s Connect, which allows students to plan, organize and execute an official conference of 150 other kids. They learn, manage, organize and direct all aspects of the conference. You can read all about their success and other programs in the One Best Thing collection. The collection is a total 104 ibooks that are available through the ibooks store.  Kid’s Connect: Student Led Technology Conferences is the book that describes the kids progress and success in detail.

ibooks

They start off with a birthday party prompt. Together, they brainstorm all the work that is needed to plan a birthday party. Then they transfer the responsibilities to plan a full-fledged, functioning conference. From the start, they have divided the responsibilities into departments and further dissect each department into individual jobs.

The students are in charge of choosing a venue and theme, creating committees, regulating communicating, and remaining professional and seeking sponsors. All of the decisions are discussed, evaluated and decided by students. By performing this task, they are given real experience with communicating and delegating judgment. Problem- based learning provides students with an end goal and permit students to experiment to reach that goal. When I read about the students performing each task, I was amazed as their competence and achievement in each department. Adults are present to oversee the preparation and assist the group when needed; however, the majority of the conference is dependent on the students.ibook

The actual conference lasts two days while students are involved in various technology projects.  Prior to arriving, students were sent out a survey to choose “breakouts” or workshops according to their interest. During the conference, they attend three of the “breakouts” determined by their survey. The facilitators of the “breakout” instruct the groups of students attending to design and create a project based around the theme of the event using technology. The ones listed in the ibook included photography and Photoshop, composition writing and video, photography and websites. Finally, after attending the “breakouts”, the groups’ creations are displayed during the evening presentation.

ibook1Overall, I was impressed while I read about the conference. I was intrigued by students being in charge of their peers learning and began thinking what I would do if I were in their place. They definitely gained some experience of strategizing and executing. Also, the students attending probably benefitted from the student-led conference because the perspective, atmosphere and expectations differed from an adult-led conference. It introduced a new outlook and environment since they were of the same age. I also loved the idea of integrating technology into projects that could be used in the classroom. I will definitely use several of the apps that were involved in the conference and the problem-based learning in my own classroom.


Week 6 Reflection: The Fabulous Life of an Elementary Teacher

Week6.1

This week, this colorful, engaging, personal teacher blog caught my eye: The Fabulous Life of an Elementary Teacher.  Immediately I could tell that teacher was invested in making material children friendly. Not only was the layout creative and vibrant; but also, it was entertaining and enthusiastic. One key trait that teachers need is to be enthusiastic and passionate about their work. Whether they are teaching about science experiments or math equations, if the teacher is enthusiastic and excited about learning, so will the students.

As I perused Lacey’s innovative blog, I noticed the majority of them offered valuable resources and insights to the teachers reading them. Not only did she link them to her post, she Week6.2gave them a review and offered some personal experience using them. Today, teachers can find numerous resources though a variety of web sites, but Lacey integrated her own success and/or effectiveness. In addition, she not only offered it but promoted it. One post in particular, Ed expo top 10 products, stated that she was part of the judging and evaluating each product. This gives her blog credibility. In additions, several times she mentions other teacher blogs, blogs she has visited or collaborated with, that can be further use to her readers.

Week6Another valuable feature about this blog is that Lacey isn’t afraid to present her personal side of her life. Although, other websites occasionally  mention their personal lives; they don’t go in depth. After reading this blog, I felt like a personally knew Lacey. In fact I was intrigued to email her so that I could continue getting to know her. By adding a personal element, she engages her readers interest and creates post that the readdress can relate to. She removes herself from an ideal teacher who has it all together, instead she reminds the audience that she is real. She has her bad days, dislikes and frustrations. But she also values progress, her good days and credits resources that have made her teacher career possible. One post out of many, presents six fun facts about herself and encourages other teachers to do the same.


Overall I really enjoyed reading Lacey’s blog. She had her own spark and flare while promoting resources and inviting others into her classroom. Her website invited all readers. I could tell she was passionate about her career and believed in her own work. She was motivated and desired to share her success and progress with others.

Digital Storytelling with Adobe Slate

More and more apps are created to ensure students and teachers theAdobe Slate presentation aids they need for an engaging presentation. There are so many options available, each with their strengths and weaknesses. The majority of them are easy to manipulate and several are useful in any topic. This past week, I created my first digital storytelling presentation introducing Native Americans using the Adobe slate app (free!).

I used this simple presentation to highlight and focus my students on the main elements of the Native American lifestyle. The text was divided and represented by with pictures and graphics. The mixture of the two was aesthetically pleasing and engaging. And Adobe slate isn’t the only digital storytelling app accessible. In fact, numerous app could be equally effective to introduce a topic, unit or myself. Digital storytelling is defined as using an digital resource to tell a story. This elements adds “compelling and emotionally engaging and interactive formats”. The apps can range from video apps, webpage apps, photo album apps and/or video recording.

I began my storytelling when I clicked on the “create my story” icon at the top of the page upon entering the app. I was then instructed to add my title and my first photo. Adobe slate could access my photo library or Dropbox or  take a photo along several options. I also was invited to change the theme. With each theme, the title and text overlapping the picture shape was altered. I settled on the Wesley theme because I liked the banner across the picture.  Next, I could add text, link or  more photos in the blank “slate” area below. I began with some text before inserting more photos. I kept my paragraphs simple and to the point so that I wouldn’t clutter my storyboard. I could modify my text with headings and body font, bullets or numbering and alignment. When I was ready to insert a photo, I could alter it to take up the whole frame, create a photo grid or make it a window. By making it a window, the picture was scrolled through as I moved down the page. I could also overlap a text box for a caption if I so desired. I was satisfied with my pattern of window, text, picture grid so I continued it. However, your creations are limited to this. Feel free to be as creative as you like to engage your audience. There was also the option of inserting a quote, which I did near the end of my slate. Once I inserted all my pictures and information, I was able to share by Facebook, Twitter, email, message, clipboard or embedded code. I could also assign a category, author, credits or select public viewing. Then my digital storyboard was complete! Again, here is tutorial to guide you through.

Adobe1 Adobe2 Adobe3Adobe4

I enjoyed working with this app. I was permitted to be creative and design my slate as I saw fit. Students could definitely work with the app and create their own as they present different topics, book reports, group projects and much more! I didn’t spend too long on my storyboard so teachers could easily create one as well during their busy schedule. The only thing that slowed me down was finding enough pictures for my grids and windows. The only disadvantage of this app is that my storyboard is without audio. I or my audience would personally have to scroll through it. If I wanted a voice over or music, I would need to go to another digital storytelling app.

Overall, the Adobe slate was effective and inviting. The pictures interspersed throughout the slate only supported my introduction further. I would encourage all to use it during their presentations if they enjoy graphics, motion and structure throughout their presentation.

Week 5: Tech Edge in the Classroom


techedge   techedg11

Apps are useful in all subjects, ranging from reading to math. Both engaging and instructional. The benefits of iPads in the classroom is that they are interactive, mobile, graphic and visual Here are a few recommended apps by tech edge. You can the Youtube channel, Tech edge, to receive weekly app/technology recommendations and reviews.

Episode 91: practice math are helpful in all levels of mathematics.

techedge1  techedge4techedge2techedg3

Math duel is an app that allows students to work together and practice at their own level. It is an interactive game that ignites friendly competition. The next math app recommended is IXLmath is an app that is available and useful for all ages in math. All levels of math from telling time to algebra is available on this app. In addition, the app aligns the quizzes with standards of that specific math element.  The students are presented a variety of answers corresponding to the math level. The app offers a timed aspect to help teachers assess the understanding of the students. After the questions are answered, the app provides explain actions and additional exercise for the students to review if they got a question incorrect. Deep see duel app requires students to choose three cards out of nine to add to the given sum. Finally, the yodel oh – math mountain app. Again, the math app provides a wide array of math practices. The students will need to choose the correct answer to the math prompt. With each correct answer the yodels moves up the mountain. The longer the student takes to answer the question, the farther the guy slides down the mountain.

Episode 154: sight and spelling words can definitely strengthen English and reading skills.

techedge5techedg6techedge7

The first recommended app was cimo spelling. It involves the a penguin crossing a ice bridge to get food. The ice bridge is made up of blocks of ice representing letters. The student is responsible of dragging and placing each ice block with the letter in the correct order to create the word. If one letter is incorrect, the penguin falls through the ice and the student is given another try, starting at the incorrect letter. The spelling test  free app is an app that allows students and teacher sot create a virtual spelling test. The teacher inserts a word and records them self saying the words. Then the student can hear the word, multiple time if needed, before writing the word in the blank. The app allows others to share their tests and presents student’s past test scores. Sight words app reinforces recognition [this is google play app, not iTunes]. There are several games available presenting sight word choices and after listening to the word, the student chooses the correct word. The app creates players so progress is saved to each player.

Episode 165: nutrition apps can be used in physical education or health class.

techedge8 techedge9 techedge10

Farm to plate app. The app present a plate illustrating the correct amount of each good group. The student can select the food category to learn more about. Each category describes where vegetables are found, which foods are considered vegetables and why people should eat vegetables. Eat & move-o-matic app demonstrate and matches specific activities to food. When a student selects a type of food, the app suggests several options of burning of that food. In addition, it provides a protip or other suggestions. The final app is the Big Fork, Little Fork app. This app allows children and parents collaborate together to create a healthy food. One section suggests tips to incorporate kids into kitchen. Another section invites parents and kids to cook using the provided recipes. It is children friendly with simple directions and large instructions.

All of these apps and many more can be useful and resourceful in the classroom. Apps can strength and engage student’s learning in any subject, even PE, Art and Music! As more and more school become 1:1 technology to student, teachers would do well to discover and implement apps within their lesson. Good luck and have fun!

Interactive Whiteboards and Screencasting: My first screencast!

Over the years, teachers have always had a place to write out or illustrate the concepts they teach in the classroom. Beginning with chalkboards, the tool has advanced through several alterations to accommodate the needs of the showme6teacher. The chalkboards turned in whiteboards, which then were projectors before finally leading to smartboards. But alas, the technology has made the chalkboard concept mobile and virtual. There are several apps that allow teachers’ whiteboards to be accessible outside of class and to the students. I tested out the Showme app this past week and loved the availability and effectiveness of it. I’ve had experience with virtual whiteboards before during my online classes. But this was the first time trying it out myself. I created my own showme board, Haiku, in a matter of minutes!

showme2

The showme app not only allowed me to create my own whiteboard lecture, it permitted me to explore other lectures. A variety of subjects were listed on the side and subtopics of each. Other whiteboards were categorized within each subject and subtopic which made my exploration quick and easy. And once I created my own account, free of charge, I could follow certain creators or subjects. I could also be part of a group which could be beneficial for student group projects or class projects.

showme1 showmeshowme4

Creating my own virtual whiteboshowme3ard with an attached lecture was a simple process which any teacher or student could achieve. I began with a “clean slate” or blank white space. I had handwriting tools and text tools. I had my choice of color, an eraser and several blank slides. I also had recorder to record my lecture to align with my drawings. I choose to discuss the elements and formation of haiku poems. And I did, quiet efficiently. Within minutes, I had my lecture recorded with corresponding drawings and figures. After I recorded my whiteboard, I could save and post it. I was showme5asked to tag it in subjects and categories of the app.  And I was finished! Here is a tutorial for extra assistance.

The only setback of the Showme app was that the recording needed to be all at once. I couldn’t record a segment of my lecture, save it and piece together to create a full lecture. Instead, I needed to time and plan what I wanted to say and draw. This limitation forced me to redo my lecture several times as I got used to drawing on the iPad and timing my drawing with what I needed to say. I found it helpful to write  my “script” ahead of time and draw my “visuals” before beginning to record. Still if I made a mistake while recording, even if it was in the middle of my lecture, I needed to start over. Personally, this was a struggle because I am perfectionist. After several takes, I learned to accept that there would be mistakes and the lecture didn’t suffer because of them.

Students could definitely benefit from learning, using and creating their own whiteboard lectures. The app engages both visual and auditory learners. As mentioned before, it could help students present to each other online and/or create visual study guides  to review for later. Showme is helpful and would be a great asset in and outside of the classroom. Be sure to view other whiteboards and experiment with it yourself! I wish you good luck when you create your own.


iMovie Trailer: Great Depression

Presentations require analysis, organization, responsibility and communication from students. They allow students to teach their fellow students, thus personally reinforcing the material. Students must practice judgment as they focus on the main ideas of a topic to present. They also must practice connecting facts to form and support their points. The current presentation programs are suffice to. PowerPoint, president and google docs. However, what iMovie has that these other programs don’t is movie magic.

imovie5iMovie is an (4.99) app that allows presenters to connect with their audience by engaging and inviting all types of students. It incorporates visual images that represent the topic, background music to support the topic theme and captions to accompany. It provides an artistic opportunity to enhance school topics. Just like a entertaining movie trailer, it draw people in and encourages them to explore further run depth.

This past week, I created my own movie trailer with the iMovie. And, surprisingly, it was simple and effective. This was the first time I attempted to create a movie so I’ll admit I was nervous. However with the default format and the provided layout it was a piece of cake. To begin, once entering the app, I was questioned whether I wanted to make a movie or trailer. This past week I trie doubt the trailer; however, I will attempt to create a movie late, so stay tuned! So I choose the trailer choice. Immediately, I was presented with several themes to format my movie. iMovie4Each one had specific backdrops, text fonts and music. After selecting one for my Great Depression movie trailer, I was directed to title my movie and create the credits. This supplies the app with potential if the movie was a group project. Next, I was given a form prompting the movie trailer script. The app permitted me ten captions to edit. They were interspersed among thirty pictures. And each picture was designated a defiant time interval. Some were about a second long, others were three seconds. After I filled out my desired captions, which included the introduction, award notification and quotations; I  could insert my pictures and/or videos. The app accessed my photo library. Once I inserted a photo, I could adjust the frame motion. On several pictures, I choose to zoom in which only increased the picture significance. However, my motion was limited to due to time limit. After, adjusting, spell checking my script…I was done! Can you believe it? Literally, four steps. My 1:35 second trailer was done in minutes. Here’s a quick tutorial to guide you through it.

iMovie3 iMovie2 iMovie

This movie app is both teacher and student friendly. Teachers could easily design a movie during heir busy schedule because it was quick and effective. Four steps remember? And students can navigate through the steps because majority of the program is default. Furthermore, iMovie has more freedom  than other presenting programs. It could be used for a variety of assignments, such as: book reports, introductions, concepts/vocabulary, scientific experiments and much more. As I mentioned in the beginning, it integrates  visual images and auditory elements that can strengthen any topic.

Overall, I was impressed by the iMovie app. It allowed me to create a formal yet captivating presentation about a the Great Depression. One reservation I have toward the default program was it didn’t allow me to insert my personal audio. Personally, I wanted to insert the song, man of constant sorrows, to present the emotion of the Great Depression. Still the app was effective, artistic and presentable. I would highly recommend this for in class use by all teachers.  Good luck!

Comic App Review: Comicmaker

comic

Remember the Sunday morning comics? The quick, entertaining short stories that represented a whole concept with a couple images and dialogue boxes? With every picture and graphic, students and adults alike were drawn in. And the short conversation  was easy to follow and symbolized a bigger picture. What if we moved this entertaining piece of work into the classroom? Not only do students learn that sometimes “less is more”; they  also learn the literary devices of dialogue, narration, onomatopoeia and symbolism. The (free) comic maker app and numerous others, realized this when they created the teacher and education friendly comic app. This app has allowed teachers/students to try their hand at simplifying and illustrating ideas as they become comic authors.

This past week, I began constructing my own app. At first, I didn’t know which topic I could cover or how comic1which layout to use. But the beauty of comics is that they can be used for multiple projects and presentations. Comics are adaptable to present book reports, practice vocab words, analyze political news, practice language skills, present a process and many more. For this review, I decided to transform a standard book report/ plot diagram into a comic strip. One of my favorite books was the The Mitten and the Hat. So once I decided this and began my comic strip creation,
I was given several options of a layout that I wanted. Each layout formatted the frames differently by size and shape. I choose the layout I did because I needed to focus on the book title and I wanted to separate the story elements from the story plot. But each layout would offer great opportunities for any project.  Next, after the design was finalized, the comic app displays a toolbar. With this toolbar, I could add my background images, text boxes and shapes. So I began with my background, a sunset over a snowy bank. I choose this form its default options but I could have accessed my photo library or the Internet if needed. Next I added my pictures to place in each frame. Again, I withdrew this from my photo library. Next, I began my text boxes. While implementing these, the app provided a variety of options along the way to accommodate my purpose of the comic. Finally, I utilized the free draw pen when I wrote out the book title in one of the two large frames.  If that was a little difficult to follow, here is a tutorial link that goes through the creation step-by-step.


comic3comic4


The comic strip definitely adds an artistic and creative aspect to presentations. This app, among others, provide students to express themselves as they display their way of thinking. I choose comic maker app because it allowed other pictures to be inserted within the comic. I value this feature because students can draw creatively, but some kids drawings aren’t clear; especially on an iPad. By allowing pictures and graphic organizers to be inserted in the comic, ideas and topics can  relayed with clarity and credibility. I enjoyed preparing the comic strip for my “book report”. However, it was immensely time consuming. Also, the freedom that the app allowed was overwhelming. When I think of students using this specific app, I fear they won’t understand or won’t be able to navigate through all the alterations. 

Overall, the comic app is great to use. I would just reserve these creation apps for older students. Younger student may struggle while creating starting from scratch. I would recommend the comics in the classroom because of their inviting, engaging and informative design. They are a visual representation of a simplified concept.


My First Tellagami Project

Technology is enabling society with each new invention. It’s allowing kids to draw without a crayon or paper. It has allowed teenagers to communicate with masses of friends with a single click of a buttons. Technology has now introduced a resource where teachers can instruct and present facts without having stand before the class.  

Tellagami is an (free) application that integrates visual recording with graphic displays. Different from recorded PowerPoint slidesTellagami or embedded voice narration of Prezi, Tellagami provides a virtual character of the teacher. This feature personalizes the message or presentation. It provides a character that audience can see where the message comes from. Furthermore, the character can provide authority and responsibility to the message. 

This past week, I tested out the program and created my own Tellagami. I began by opening the application and selecting the tellgami5create option. Next, I was prompted to choose a background. The background was the foundation of the message. For this trial, I choose to introduce the water cycle. So once I selected an image from my photo library, I moved on to tellgami3creating my character. I could personalize her to a certain degree. Because I choose to the free version for this trial, I only had a few options during personalizing. The available alterations included hair, dress, eye color and emotions. Next, I had the freedom to size my character and move her around the background. Last, I recorded my message for the character to say. Once again, the free app was limited during this options. After my recording was complete, the character was synchronized to match my voice. The app added appropriate gestures during my speech.  The process is simple, quick and easy. Here’s a tutorial that directs you through each step.

tellgami5tellgami1

Although this app was simple and quick to create, it was limited in a couple features. I was personally disappointed that I could only insert one background picture. I had to decide on the best picture that represented my entire topic. The water cycle was simple enough to find a picture to that clearly illustrates the concept. But, if I choose to introduce another topic like The Civil War, the search for the perfect picture would have been difficult. Partly because there are so many elements in the Civil War to be represented one picture. So, teachers are limited to certain topics while using this app. One  obstacle that Tellagami presented was it didn’t save the work/video when the creator switched between apps. While I created this, I switched between my photo library and research on the Internet. However, each time I returned to the Tellagami, I lost my recording, my background picture and character position. This was easily fixed; still, it was an inconvenience. Lastly, the Tellagami only permitted thirty seconds of recording. I was using the free version, but even if I upgraded, the recording was only allotted ninety seconds. Personally, I think this allotment is too short for students/teacher to effective presentation. 

tellgami4

In conclusion, this Tellagami app is valuable in and outside the classroom. It allows teachers to follow students home, providing a visual and personal message for countless topics. From topic introductions to research projects, from instructions to definitions and from visual messages to grading or commenting on a homework, Tellagami opens many opportunities for teachers/students to interact.  I will definitely utilize this in my classroom and encourage students to use this for presentations. Here is the website if you want to explore this program further or just need some suggestions. Good Luck!


Word Clouds in the Classroom

Applications, or apps, are growing exponentially before our very eyes. With the use of iPads, tablets and Kindles apps are transforming the accessibility to games, shows and programs. Effective teachers are encouraged to be aware of a wide variety of resources during their instruction. I definitely would promote the usage of apps in the classroom, WordCloud included.

Apps provide the visual representation of the material for the class; WordCloud isn’t excluded of this feature. I am a visual learner who loves words, so this app was perfect for me. Although, I didn’t struggle immensely with comprehension of vocabulary words in grade school, I had a few classmates who did. I did struggle with categorizing specific vocabulary words with specific topics. Both my classmates and myself would have benefited greatly if we were exposed to WordClouds.

What is admirable about an app, like WordCloud, is that it translates standard class material into engaging graphics. There are several WordCloud apps available, each offering different features and freedom to customize. This past week, I reviewed the app called WordPack. For ages four years and older; WordPack could be implemented in any classroom, from pre-school to high school.  What truly stood out to me about this app versus others was the option of customizing the layout. wordpackAs previously stated, I struggled with corresponding words with topics. The standard twenty vocabulary list that mixed all the words together, despite the topics they represented, didn’t help my organization. This app, however, allowed the teachers to form their “word cloud” into shapes. The program offered 120 shape options, more than enough to symbolize majority of topics.  The purposeful shaping could further help visual learners remember the words by causing them to also remember the corresponding symbol. Although this app did cost a dollar from the iTunes store, I believe it was well worth it because of the shape/customize option offered for my word cloud.  Furthermore, the shapes could help students with size comparison. One lesson to use the different sizes of clouds could about the planets. Have each student create a planet, use the correct color and size the circle shape so it’s relative to the other planet word clouds.

workpack2

Here’s example that I did to investigate the app. My “word cloud” focused on the geographic landforms. I inserted 50+ wordpack5words in the space provided to input the text that will be used in the word cloud. I did also have the option of inserting a URL, if I found a group of words that I wanted to use on a website. After inserting the vocabulary list, the words were grouped into the default shape of a circle.  Next, I could customize the shape, color theme, font, and layout. There were numerous shapes available, from animals to symbols. I chose the US map silhouette. I thought the continent was   appropriate because the US is a geographical location that has several of the landforms listed in the cloud. I also chose the color scheme of blue and green to continue the earth theme. The default font wasn’t distracting so I didn’t change that. The default layout, however, could provide some concern. The program offered six options: horizontal, vertical, mostly horizontal, mostly vertical, half/half and any direction. Each was readable but the option definitely depends on how the teacher would be using it. The vertical would not be advisable if the word cloud is projected on a white board because the audience would have to tilt their neck in order to read it. However, the half or any option could be used if the word cloud was printed and handed out to the class. This way, the students could enjoy rotating the page back and forth to read all the words. Displayed below are three of the options that each had their strengths and weaknesses. Personally, I believe the layout decision depends on the shape, amount of words and viewing format for you cloud.

workpack6 wordpack4 wordpack1

         ^ Horizontal option                      ^ Any direction                                    ^ Half vertical, Half horizontal

Word clouds aren’t limited to vocabulary lists. Numerous lessons plan could use words clouds as students demonstrate their understanding, create writing pieces or define different topics. Each word cloud can be adaptable to any text, whether that text is English, Science, Social Studies, or even, Math related. Word clouds can also decide which words to focus on during the week. Since the magnified words are random, whichever words are enlarged are the words the students need to study and how they attribute to the overall topic of the word cloud.

Overall, I thought this app could be a great resource in the classroom. It was easy to use and create. It also allowed some freedom to create your unique cloud.  Furthermore, it gave an option to share and save it through email, Facebook or twitter. My reservation is about the word placement and size within the cloud. As you can see, some words are bigger than others. I would suggest pointing out to the students that these words don’t posses more importance than the other smaller words. But these disproportionate sizes are included in all WordClouds. I highly recommend teachers to use WordPack to entice their students. The word size is random and quirky, the colors are vibrant and the shapes are emblematic.