Inspiring Ideas for Teachers, iTunes U courses

ideas4

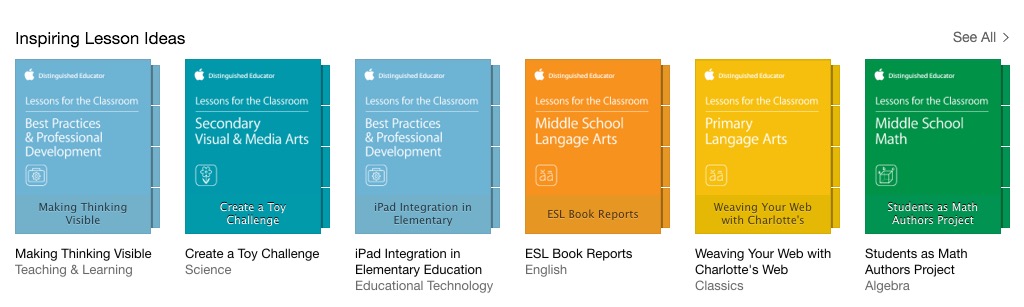
The Inspiring Lesson ideas collection is a series of books that each focus on a specific topic in an education subject. Within each course, the reader is provided with 10-15 suggestions that are included in the lesson as well as the objective. The reader can choose to subscribe to the course and receive additional suggestions later. Some of the general subjects included are English, Math, Social Studies, Science, ESL and technology.

There are 30 books to explore in this collection. The other three books that caught my eye, other than the Retelling Story Elements that I’m reviewing, are Non-Verbal & Visual Communications, The Graphic Novel and Weaving the Web with Charlotte’s Web.

itunesuI found this collection by selecting my iTunes U app on my iPad. Once I entered the program, I looked for the “For Educators” icon. I was then transferred to a screen with several different categories. I scrolled till I found the category “Inspiring Lesson Ideas” with a line of multi-color books underneath. I selected “See All” to scan over the 30 books in the series.

After I choose the course, Retelling Story Elements, I was introduced to a description, course outline and twelve suggestions/activities that align with the course. I noticed the course ideas3outline and description was straightforward and concise.  As I skimmed the suggestions, I also noticed the variety of them. Several apps were included as well as several forms of activities. By just looking at the title, I noticed the Trading cards, dropbox, imovie, corkulous and drawing pad apps were listed and played a role in the lesson. Then the lesson also included a worksheet, several videos, checklist and lecture. I was taken aback that all these could be used in a lesson for retelling story elements. I then used the ideas and brainstormed some more apps that could be used such as thinglink, prezi, imovie, pages, showme and many more. As well as some activities such as story element chart, flashcards, matching. Once I realized the freedom and began thinking out-of-the-box for this particular topic, I surprised myself with how many resources could be used for this one lesson.ideas

ideas1


After skimming the list, I began selecting each activity. I want to begin with the “Make way for the Ducklings” short video. This was one of my favorite books as child so I was pretty familiar with it. The video contained several drawings of the story’s elements with a child voice-over. It was about a minute and half long, but the objective of the course was achieved. It was clear that the child speaking understood each of the elements she described and worked hard on her illustrations. I’m unsure whether she independently created the video or if she had some help, either way the video was a definite success. It combined the traditional activity of drawing pictures with the technology aspect of creating a video.  Overall, it was creative and objective. Furthermore, teachers could definitely alter the assignment to meet their own lessons if needed.


The next activity I explored was the corkulous app. Corkulous is a virtual corkboard. Before beginning the students had already filled out a retelling G.O page, also provided in the activities, and now add post-it/corks on the board representing each detail. This allowed them the space to move their elements around, group them together and organize them any way they saw fit. Students could then save their board and return later if needed. Both the page and the corkulous app provided an opportunity for students to organize, plan ahead, experiment and label their ideas.

I believe the inspiring lesson idea collection is quite effective. I wish they had more subjects because I was so pleased with what I found in my course. But it’s a definite beginning point for some lesson and their suggestions are reliable. I glanced through some other courses and saw activities that I will incorporate in my own lessons. The courses inspired me to think creatively and use all the resources that are available to me.


Using Apps in the Classroom, iTunes U courses

apps9

Apps in the classroom collections is series of courses that offer ideas and activities to teachers who are interested in integrating technology in their classrooms. The collection includes activities that are appropriate to certain age groups and/or subjects. The ideas encourage problem solving, creativity and exploration through technology with a educational goal.apps8

There are 18 books to explore in this collection. The other three books that caught my eye, other than the SketchBook Express that I’m reviewing, are Puppet Pal’s HD Director’s Pass, Stop Motion Studio and If Shakespeare could Tweet: Transforming Literature with iOS.

itunesuI found this collection by selecting my iTunes U app on my iPad. Once I entered the program, I looked for the “For Educators” icon. I was then transferred to a screen with several different categories. I scrolled till I found the category “Using Apps in the Classroom” with a line of blue books underneath. I selected “See All” to scan over the 18 books in the series.

As I read about each activity in the classroom, I enjoyed how technology permitted art integration into each subject. With each activity, students were drawing on the apps10sketchbook app to illustrate concepts, ideas and labels. Not only were they absorbing information but they were associating each subject with a illustration. This can increase memory and engages students who are preferably visual learners. I also loved how the activities were aligned by age group and subjects. But the ibook provided enough information through the objective, overview, activity and sample rubric, that the activities could easily be altered for different age groups than prescribed. apps

apps6

A couple activities were truly interesting were the science and math lesson. I didn’t except to find activities in either of the subjects that could include art, technology and educational subject. The first I’d like to elaborate was the Mirror, Mirror activity, which focused on symmetry in math. This activity was listed for 5-11 year old so that alone provides some freedom. The students are instructed to draw a self portrait using SketchBook Express. The app offers the students a symmetry feature. This activity enables students’ creativity as well as research while the students look for artists’ styles and self-portraits for inspiration. Symmetry is difficult free-hand; however, this app allows students to skip over the frustration of producing accurate symmetry and focusing on the concept instead.apps2


The other app that I enjoyed learning about was the Solar System Concept Map. This activity required student to create a concept map using Sketchbook as well. They may experiment web or hierarchy maps as they label the planets, stars, moon and more. I loved how the app displayed the spatial distance of the solar system and distinguished the concepts of the map without getting over crowded or messy. Furthermore, I enjoyed how map and solar system looked similar when placed side to side. The Sun was the center with various planets surrounding it just as the planets surrounded the main concept of the solar system in the concept map.


apps4 apps3       


Overall, I really enjoyed looking through the sketchbook course. I received several ideas that I’ll integrate into my own classroom. I also realized that apps can introduce an artistic element and organization to subjects. The course also supported the idea that apps are available and can be used by any age. The same app can be used for kindergarten math to senior science. Apps are becoming a vital and useful tool in the classroom.


One Best Thing

ibook3

Have you ever been to conference? Did you go as a kid? Was the conference organized by kids? No..? I guess you didn’t attend Kid’s Connect, a conference by kids for kids.

Mike Anderson founded this conference and created it to what it is today. He is part of the ADE program which focuses on using Apple Technology in and out of the classroibook2om.  Anderson is one out of many people who are utilizing and encouraging the Apple products integration in the classroom. They are devoted to discover to opportunities and apply new ideas to help engage students.  He realized that value of problem-based learning. And so he created the conference, Kid’s Connect, which allows students to plan, organize and execute an official conference of 150 other kids. They learn, manage, organize and direct all aspects of the conference. You can read all about their success and other programs in the One Best Thing collection. The collection is a total 104 ibooks that are available through the ibooks store.  Kid’s Connect: Student Led Technology Conferences is the book that describes the kids progress and success in detail.

ibooks

They start off with a birthday party prompt. Together, they brainstorm all the work that is needed to plan a birthday party. Then they transfer the responsibilities to plan a full-fledged, functioning conference. From the start, they have divided the responsibilities into departments and further dissect each department into individual jobs.

The students are in charge of choosing a venue and theme, creating committees, regulating communicating, and remaining professional and seeking sponsors. All of the decisions are discussed, evaluated and decided by students. By performing this task, they are given real experience with communicating and delegating judgment. Problem- based learning provides students with an end goal and permit students to experiment to reach that goal. When I read about the students performing each task, I was amazed as their competence and achievement in each department. Adults are present to oversee the preparation and assist the group when needed; however, the majority of the conference is dependent on the students.ibook

The actual conference lasts two days while students are involved in various technology projects.  Prior to arriving, students were sent out a survey to choose “breakouts” or workshops according to their interest. During the conference, they attend three of the “breakouts” determined by their survey. The facilitators of the “breakout” instruct the groups of students attending to design and create a project based around the theme of the event using technology. The ones listed in the ibook included photography and Photoshop, composition writing and video, photography and websites. Finally, after attending the “breakouts”, the groups’ creations are displayed during the evening presentation.

ibook1Overall, I was impressed while I read about the conference. I was intrigued by students being in charge of their peers learning and began thinking what I would do if I were in their place. They definitely gained some experience of strategizing and executing. Also, the students attending probably benefitted from the student-led conference because the perspective, atmosphere and expectations differed from an adult-led conference. It introduced a new outlook and environment since they were of the same age. I also loved the idea of integrating technology into projects that could be used in the classroom. I will definitely use several of the apps that were involved in the conference and the problem-based learning in my own classroom.


CKV: The Legacy of “Half-Pint”

LIW5

I have already discussed the importance of visual aids during a presentation. Not only does it reinforce material, it also engages and intrigues students. Furthermore, it beneficial to the presenter as well. To make a presentation, the presenter needs to familiar, organized and knowledgeable with the material. By creating a presentation instead of a paper, the presenter is required to repeatedly look and adjust to the material.

imovie5I have already experimented  with the (free!) iMovie app when I did my trailer. [Check out my trailer and previous post reviewing it] The trailer was simple and successful. This week, I experimented with the movie portion of the app. The movie creation varied significantly from the itrailer; however, it didn’t cause any difficulty or need any prior experience as I expected. The movie created introduced the best selling author, Laura Ingalls Wilder. It was created for the purpose to Celebrate Kansas. This is website that honors Kansas past and elements. I choose to highlight the well-known author because her books are revered and represents the time period of settling in the frontier. Like many other children and adults, I loved her books. In fact, they were the ones that determined my favorite genre: historical fiction. I feel like she should be represented in Kansas history because she recounts an important period. Here is my mini movie, titled “The Legacy of Half Pint“. It recounts her life and recognizes her legacy. [For those who aren’t familiar with the books, Half-Pint was her nickname by Papa]

 https://www.youtube.com/watch?v=9ju25BnpAA0


LIW

LIW4 To begin, I selected the theme of movie. Afterwards, I was directed to a black screen and a timeline where I could insert audio, video and photos. I began with my photos. I had selected several photos previous to starting, so I accessed my photo library. But I also had the option of capturing a photo or iMovie library and iCloud Drive. Once I selected my photo(s), their thumbnails appeared on the timeline below the screen. I could adjust the time they were displayed by moving the ends or picking it up and moving it to place desired.  In addition, alter the beginning and end position of each. Filters and overlying text options were also available. Afterward, I began on my dialogue. I selected the microphone in thee bottom right corner and clicked “record”. It gave me a count from three before I began recording. When I was finished, I could review my recording, redo it immediately or cancel it. The recording time was displayed on the timeline as a blue bar. Similarly to the photo length, I could adjust and move my recording as I saw fit. Lastly, I worked on the transitions. There were several options of how each picture moved into the next. Here is a tutorial with additional help.


LIW2 LIW3

The process took longer than the trailer but not as long as I expected. Once I got the hang of the process and understood how I wanted my movie to end, it was pretty simple. However, I was not impressed with the background audio. I was interested in selecting some background music for several pictures that didn’t need dialogue and I wanted to insert a default theme music. However, I could adjust it or remove it from the times I recorded my dialogue. Other than that I was overall pleased with the app and how my movie turned out. I wish everyone else good luck and encourage using short personal videos in the classroom.

Week 7 Blog Reflection: Just a Substitute Teacher…

week7

I have been reviewing teacher blogs each week for the past two months. They’ve ranged from preschool/kindergarten to older elementary classrooms. Some were invested and utilized technology while others valued the traditional activities in the classroom. Some are focused on creative and inventive procedures while others were objective. I have found several that interest me and plan to return to read their posts regularly. The blog that I discovered this week differs from the previous one as it is written by a substitute teacher. The Just a Substitute Teacher truly tells the adventures of a Sub in the classroom.

Now we have all had our share of subs in the classroom, whether it be while we were a student in the class or we needed someone to instruct our class. Frankly, I admire substitute teachers. Although their work isn’t full time and scheduled like regular teachers, they need to possess the same, if not more, self efficacy. The belief that they can achieve and reach even the hardest students in their work. To approach an unknown environment/class and instruct a class of estranged students requires patience and perseverance. While a regular teacher gains the students’ attention, work and respect throughout the year, the sub needs it for a day or less. I could say more about the substitute teachers who don’t get recognized for their hard work; however, I’ll tell you about the blog I found instead.

Despite the short posts retelling singular events, Kauai Mark truly allows his readers to enter the classroom he substitutes for. He informs them about surprising events and certain procedures through the eyes of a substitute teacher. He even offers the inside scoop of a substitute circle/organization.

I enjoyed reading excerpts from Mark’s substituting days and learned more about how the classroom looks from a visitor’s perspective. Several of the posts included certain procedures7.2 or processes he implements while in the classroom. I thought this could be helpful for both other substitute teacher and regular teachers. One that I’ll highlight was the game of the Magic Trash. It simple yet effective by requiring students to pick up trash from the floor to find the “magic trash item” that Mark has already decided upon. Whoever picks up the item and places it the trash receives a prize. This reinforces cleaning up along with some competition and an ultimate goal.

week7.1Another post that caught my eye was show your work. This post included a video displaying a phone app that allows students to scan problems, give them the answer and guide them through the steps to solve the problem.  Now, where was this when I was completing Calculus and why didn’t I know about this? But it goes to show that technology is providing resources and accessibility to aid students and teachers should be aware of them. I figured Mark had an advantage since he spends half of his time in the classroom and the other half outside. This allows him, as a substitute teacher, some distance from the classroom and be more in tuned to the society.

7.3

This last post I want to highlight is titled, The Santa Question. This post just supports the fact that substitute teachers should be prepared to expect the unexpected with less tools than a regular teacher has. During this 2nd grade assignment, Mark was surprised with a last-minute lesson plan, integrating a new student in the classroom and supporting both sides of Is Santa real? This both amused me and astounded me. Substitute teachers really are flexible and ready for anything that comes their way. Furthermore, unlike regular teachers who have knowledge of the school and class, substitute teachers jump in for a day and perform all the same tasks. Overall, I truly enjoyed reading the adventures of a classroom from a substitute teacher perspective.

Week 6 Reflection: The Fabulous Life of an Elementary Teacher

Week6.1

This week, this colorful, engaging, personal teacher blog caught my eye: The Fabulous Life of an Elementary Teacher.  Immediately I could tell that teacher was invested in making material children friendly. Not only was the layout creative and vibrant; but also, it was entertaining and enthusiastic. One key trait that teachers need is to be enthusiastic and passionate about their work. Whether they are teaching about science experiments or math equations, if the teacher is enthusiastic and excited about learning, so will the students.

As I perused Lacey’s innovative blog, I noticed the majority of them offered valuable resources and insights to the teachers reading them. Not only did she link them to her post, she Week6.2gave them a review and offered some personal experience using them. Today, teachers can find numerous resources though a variety of web sites, but Lacey integrated her own success and/or effectiveness. In addition, she not only offered it but promoted it. One post in particular, Ed expo top 10 products, stated that she was part of the judging and evaluating each product. This gives her blog credibility. In additions, several times she mentions other teacher blogs, blogs she has visited or collaborated with, that can be further use to her readers.

Week6Another valuable feature about this blog is that Lacey isn’t afraid to present her personal side of her life. Although, other websites occasionally  mention their personal lives; they don’t go in depth. After reading this blog, I felt like a personally knew Lacey. In fact I was intrigued to email her so that I could continue getting to know her. By adding a personal element, she engages her readers interest and creates post that the readdress can relate to. She removes herself from an ideal teacher who has it all together, instead she reminds the audience that she is real. She has her bad days, dislikes and frustrations. But she also values progress, her good days and credits resources that have made her teacher career possible. One post out of many, presents six fun facts about herself and encourages other teachers to do the same.


Overall I really enjoyed reading Lacey’s blog. She had her own spark and flare while promoting resources and inviting others into her classroom. Her website invited all readers. I could tell she was passionate about her career and believed in her own work. She was motivated and desired to share her success and progress with others.

Digital Storytelling with Adobe Slate

More and more apps are created to ensure students and teachers theAdobe Slate presentation aids they need for an engaging presentation. There are so many options available, each with their strengths and weaknesses. The majority of them are easy to manipulate and several are useful in any topic. This past week, I created my first digital storytelling presentation introducing Native Americans using the Adobe slate app (free!).

I used this simple presentation to highlight and focus my students on the main elements of the Native American lifestyle. The text was divided and represented by with pictures and graphics. The mixture of the two was aesthetically pleasing and engaging. And Adobe slate isn’t the only digital storytelling app accessible. In fact, numerous app could be equally effective to introduce a topic, unit or myself. Digital storytelling is defined as using an digital resource to tell a story. This elements adds “compelling and emotionally engaging and interactive formats”. The apps can range from video apps, webpage apps, photo album apps and/or video recording.

I began my storytelling when I clicked on the “create my story” icon at the top of the page upon entering the app. I was then instructed to add my title and my first photo. Adobe slate could access my photo library or Dropbox or  take a photo along several options. I also was invited to change the theme. With each theme, the title and text overlapping the picture shape was altered. I settled on the Wesley theme because I liked the banner across the picture.  Next, I could add text, link or  more photos in the blank “slate” area below. I began with some text before inserting more photos. I kept my paragraphs simple and to the point so that I wouldn’t clutter my storyboard. I could modify my text with headings and body font, bullets or numbering and alignment. When I was ready to insert a photo, I could alter it to take up the whole frame, create a photo grid or make it a window. By making it a window, the picture was scrolled through as I moved down the page. I could also overlap a text box for a caption if I so desired. I was satisfied with my pattern of window, text, picture grid so I continued it. However, your creations are limited to this. Feel free to be as creative as you like to engage your audience. There was also the option of inserting a quote, which I did near the end of my slate. Once I inserted all my pictures and information, I was able to share by Facebook, Twitter, email, message, clipboard or embedded code. I could also assign a category, author, credits or select public viewing. Then my digital storyboard was complete! Again, here is tutorial to guide you through.

Adobe1 Adobe2 Adobe3Adobe4

I enjoyed working with this app. I was permitted to be creative and design my slate as I saw fit. Students could definitely work with the app and create their own as they present different topics, book reports, group projects and much more! I didn’t spend too long on my storyboard so teachers could easily create one as well during their busy schedule. The only thing that slowed me down was finding enough pictures for my grids and windows. The only disadvantage of this app is that my storyboard is without audio. I or my audience would personally have to scroll through it. If I wanted a voice over or music, I would need to go to another digital storytelling app.

Overall, the Adobe slate was effective and inviting. The pictures interspersed throughout the slate only supported my introduction further. I would encourage all to use it during their presentations if they enjoy graphics, motion and structure throughout their presentation.

Week 5: Tech Edge in the Classroom


techedge   techedg11

Apps are useful in all subjects, ranging from reading to math. Both engaging and instructional. The benefits of iPads in the classroom is that they are interactive, mobile, graphic and visual Here are a few recommended apps by tech edge. You can the Youtube channel, Tech edge, to receive weekly app/technology recommendations and reviews.

Episode 91: practice math are helpful in all levels of mathematics.

techedge1  techedge4techedge2techedg3

Math duel is an app that allows students to work together and practice at their own level. It is an interactive game that ignites friendly competition. The next math app recommended is IXLmath is an app that is available and useful for all ages in math. All levels of math from telling time to algebra is available on this app. In addition, the app aligns the quizzes with standards of that specific math element.  The students are presented a variety of answers corresponding to the math level. The app offers a timed aspect to help teachers assess the understanding of the students. After the questions are answered, the app provides explain actions and additional exercise for the students to review if they got a question incorrect. Deep see duel app requires students to choose three cards out of nine to add to the given sum. Finally, the yodel oh – math mountain app. Again, the math app provides a wide array of math practices. The students will need to choose the correct answer to the math prompt. With each correct answer the yodels moves up the mountain. The longer the student takes to answer the question, the farther the guy slides down the mountain.

Episode 154: sight and spelling words can definitely strengthen English and reading skills.

techedge5techedg6techedge7

The first recommended app was cimo spelling. It involves the a penguin crossing a ice bridge to get food. The ice bridge is made up of blocks of ice representing letters. The student is responsible of dragging and placing each ice block with the letter in the correct order to create the word. If one letter is incorrect, the penguin falls through the ice and the student is given another try, starting at the incorrect letter. The spelling test  free app is an app that allows students and teacher sot create a virtual spelling test. The teacher inserts a word and records them self saying the words. Then the student can hear the word, multiple time if needed, before writing the word in the blank. The app allows others to share their tests and presents student’s past test scores. Sight words app reinforces recognition [this is google play app, not iTunes]. There are several games available presenting sight word choices and after listening to the word, the student chooses the correct word. The app creates players so progress is saved to each player.

Episode 165: nutrition apps can be used in physical education or health class.

techedge8 techedge9 techedge10

Farm to plate app. The app present a plate illustrating the correct amount of each good group. The student can select the food category to learn more about. Each category describes where vegetables are found, which foods are considered vegetables and why people should eat vegetables. Eat & move-o-matic app demonstrate and matches specific activities to food. When a student selects a type of food, the app suggests several options of burning of that food. In addition, it provides a protip or other suggestions. The final app is the Big Fork, Little Fork app. This app allows children and parents collaborate together to create a healthy food. One section suggests tips to incorporate kids into kitchen. Another section invites parents and kids to cook using the provided recipes. It is children friendly with simple directions and large instructions.

All of these apps and many more can be useful and resourceful in the classroom. Apps can strength and engage student’s learning in any subject, even PE, Art and Music! As more and more school become 1:1 technology to student, teachers would do well to discover and implement apps within their lesson. Good luck and have fun!

Interactive Whiteboards and Screencasting: My first screencast!

Over the years, teachers have always had a place to write out or illustrate the concepts they teach in the classroom. Beginning with chalkboards, the tool has advanced through several alterations to accommodate the needs of the showme6teacher. The chalkboards turned in whiteboards, which then were projectors before finally leading to smartboards. But alas, the technology has made the chalkboard concept mobile and virtual. There are several apps that allow teachers’ whiteboards to be accessible outside of class and to the students. I tested out the Showme app this past week and loved the availability and effectiveness of it. I’ve had experience with virtual whiteboards before during my online classes. But this was the first time trying it out myself. I created my own showme board, Haiku, in a matter of minutes!

showme2

The showme app not only allowed me to create my own whiteboard lecture, it permitted me to explore other lectures. A variety of subjects were listed on the side and subtopics of each. Other whiteboards were categorized within each subject and subtopic which made my exploration quick and easy. And once I created my own account, free of charge, I could follow certain creators or subjects. I could also be part of a group which could be beneficial for student group projects or class projects.

showme1 showmeshowme4

Creating my own virtual whiteboshowme3ard with an attached lecture was a simple process which any teacher or student could achieve. I began with a “clean slate” or blank white space. I had handwriting tools and text tools. I had my choice of color, an eraser and several blank slides. I also had recorder to record my lecture to align with my drawings. I choose to discuss the elements and formation of haiku poems. And I did, quiet efficiently. Within minutes, I had my lecture recorded with corresponding drawings and figures. After I recorded my whiteboard, I could save and post it. I was showme5asked to tag it in subjects and categories of the app.  And I was finished! Here is a tutorial for extra assistance.

The only setback of the Showme app was that the recording needed to be all at once. I couldn’t record a segment of my lecture, save it and piece together to create a full lecture. Instead, I needed to time and plan what I wanted to say and draw. This limitation forced me to redo my lecture several times as I got used to drawing on the iPad and timing my drawing with what I needed to say. I found it helpful to write  my “script” ahead of time and draw my “visuals” before beginning to record. Still if I made a mistake while recording, even if it was in the middle of my lecture, I needed to start over. Personally, this was a struggle because I am perfectionist. After several takes, I learned to accept that there would be mistakes and the lecture didn’t suffer because of them.

Students could definitely benefit from learning, using and creating their own whiteboard lectures. The app engages both visual and auditory learners. As mentioned before, it could help students present to each other online and/or create visual study guides  to review for later. Showme is helpful and would be a great asset in and outside of the classroom. Be sure to view other whiteboards and experiment with it yourself! I wish you good luck when you create your own.


Osmo Words

myosmo


mywords4Digital flashcards. That essentially what Osmo Words program presents to kids. Only Osmo takes it a step further and instructs students to spell the terms/words as well. Not only do they associate a term with a visual graphic but they practice their spelling and correlate the word with the picture. I would’ve love to use this in the classroom when I was younger. It combines educational value with an engaging game. In addition, Osmo words can be completed by individuals or in pairs/groups.


I’ll admit I have always struggled with scientific terms and concepts. So this past week, I created a Osmo word game that focused on the  scientific terms: the food chain. And truth be told, I actually relearned some vocabulary. Even while I was creating my word game, the correlation between the pictures and captions was clear and they aided me to connect with the terms.   Osmo


                                     Herbivore             Photosynthesis              Heterotroph
Biotic                      Omnivore                 Carnivore                    Producer
Consumer             Decomposer                scavenger                   Predator
Prey                         Food Chain              Food web                      Habitat
Energy Pyramid     Abiotic                     Ecosystem

I was happily surprised how easy it was to create the game. First step was to figure out my topic I wanted to develop. Next, I needed to find several words that aligned with my topic. I mywordsfound 18 words. Still, I didn’t see a limit on the program, so  don’t hesitate to do as many as you need. When I decided on my words, I needed pictures to accompany them. Remember, this was all on my own. Also keep in mind, the photos need to be 1024×768 resolution for the best results. Only after I found all the picture I needed and save them to my picture library did I enter the Osmo program. I needed to create an account first before creating my album. After I added an album, I titled it. Then one by one I inserted my pictures. I’m sure you could insert them all at once but I was using my iPad which slowed me down. After inserting my pictures, I added my words to them. And I found out, I could assign several words to the picture if I wanted. Each word needed to be classified to a level: easy, medium, hard, impossible. Next, I had the option of cropping my picture as I desired. After adjusting and labeling my pictures, all that was left to do was to publish. Publishing my album sent to it be approved by the program before publishing it to the public.

mywords2 mywords3

Osmo words can be a vital resource in and out of the classroom. And it can be used for all subjects. Teacher may use it for practice or assessments, free time or assignments. Students could also use it during their presentations, engaging their audience while reinforcing terms. Osmo words is a great app that accessible and productive. Give it a try!